An alternative to using OpenSSL with Apache httpd is to use GnuTLS. GnuTLS supports TLS 1.2 and TLS 1.1 aside from the cryptographic protocols supported by OpenSSL. Note, however, that SSL 2.0 is not supported.
GnuTLS also supports secure renegotiation which stops attackers from intercepting and injecting data in a TLS connection. Secure renegotiation is discussed in RFC5746
The following software are needed to get GnuTLS to work in Apache httpd:
- GMP (Gnu MP) – http://gmplib.org/
- Nettle – http://www.lysator.liu.se/~nisse/nettle/nettle.html
- libgpg-error – http://www.gnupg.org/related_software/libgpg-error/
- libgcrypt – http://directory.fsf.org/project/libgcrypt/
- GnuTLS – http://www.gnu.org/software/gnutls/
- mod_gnutls – http://www.outoforder.cc/projects/apache/mod_gnutls/
The httpd module that enables GnuTLS in Apache httpd is mod_gnutls. One interesting feature is mod_gnutls’ support for Server Name Indication (SNI) which allows you to configure the web server to use one IP address for multiple TLS-enabled hostnames (just like the configuration for regular name-based virtual hosts).
The above software packages are to be installed in the same order. These packages might be available for your favorite Linux distribution. In our case, we simply compile and install from the original sources.
[GARD align=”center”]
Here are the configuration statements used:
GnuMP:
./configure
make
make check
make install
Nettle:
./configure --enable-shared
make
make check
make install
libgpg-error:
./configure
make
make check
make install
libgcrypt:
./configure
make
make check
make install
GnuTLS:
./configure
make
make check
make install
mod_gnutls:
./configure --with-apxs=/opt/apache2/sbin/apxs
make
make install
One thing to add to the Apache httpd configuration is the module specification:
LoadModule gnutls_module modules_dirname/mod_gnutls.so
The documentation for mod_gnutls is straightforward. You can find examples of configurations in the documentation.
A good way to test if your TLS-enabled site works properly is to use the testing tool of SSLLabs: http://www.ssllabs.com/. The test will determine the soundness of your security configuration. Take note that the test uses the features of Firefox 3.6.x to connect to your site. Apparently, this version of Firefox doesn’t seem to support SNI.
If you have trouble making the TLS cache to work for db/gdbm files, check the permissions on the filesystem to see if the web server is allowed to create, read, and write to the cache file. Make sure that Apache httpd, via the Apache Portable Runtime (APR), supports the use of the Berkeley DB and/or the GNU dbm libraries. In our case, we had to compile the APR to support db and gdbm explicitly.
Update: 25 Jul 2011
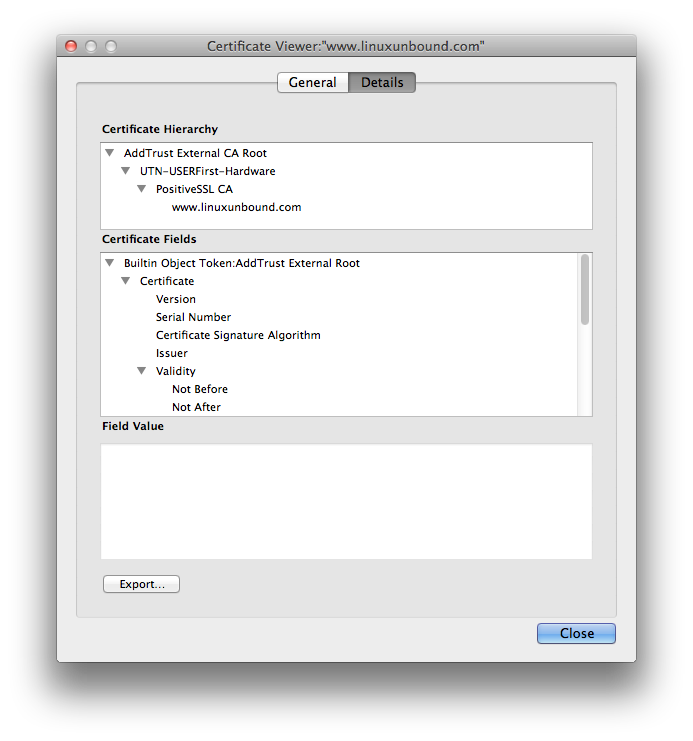
When installing the digital certificate for your site, make sure the certificate along with a certificate bundle from the issuer are in the proper order. For example, for linuxunbound.com, the certificate hierarchy looks like this:
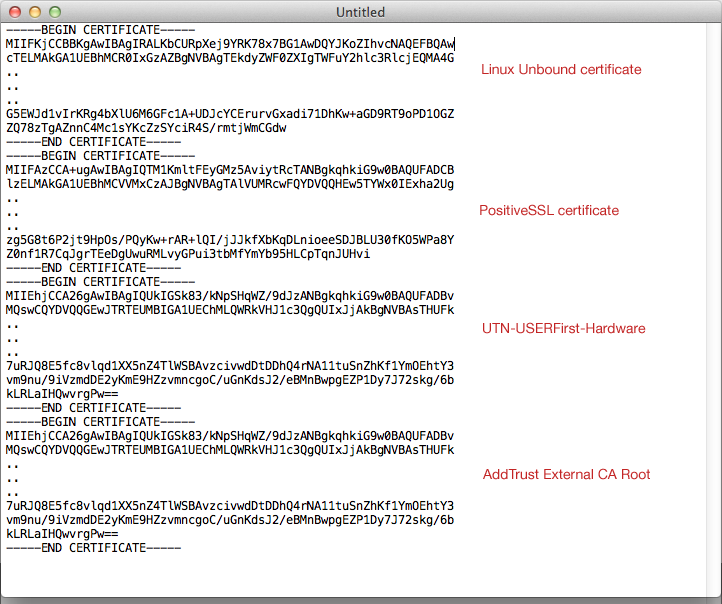
As for the actual certificate bundle, the certificates should be in the following order:
As you can see above, the linuxunbound.com certificate comes first, followed by the rest in reverse order. Compare this with the hierarchy as seen by the web browser.
In Apache httpd 2.x, the configuration shall look like this:
<IfModule gnutls_module>
  GnuTLSEnable on
  GnuTLSSessionTickets on
  GnuTLSPriorities NORMAL
  GnuTLSKeyFile /path_to_private/key
  GnuTLSCertificateFile /path_to_public/certificate_bundle.crt
</IfModule>
For performance reasons, a cache should be set up:
GnuTLSCache dbm "/path/to/tls-cache"
GnuTLSCacheTimeout 600
where tls-cache is the cache file. Note that in the above example, we use the BerkeleyDB format.

